Advanced Authentication Developer Guide
Overview
Advanced Authentication is a PAR Punchh Platform feature that enables the use of third-party authentication services to authenticate with PAR applications. It also enables password-less authentication by using email or SMS message to acquire a one-time-password (OTP) to log in with either the email address or phone number.
Intended Audience
This developer guide is intended for software developers with third-party software vendors. It provides information on how to use the PAR Punchh Advanced Authentication REST APIs to authenticate with PAR applications.
The audience needs to understand the full use cases of Advanced Authentication.
Getting Started
To get started with Advanced Authenticaton, the following is a useful course of action:
1. Learn the key use cases and key concepts described in this document. These concepts and use cases are useful to understand when studying the scenarios.
2. Acquire the prerequisites, such as a Punchh business test environment configured with Advanced Authenticaton enabled. Your PAR Punchh representative will provide these for you.
3. Download Postman or use it from your web browser. Fork the PAR Punchh Postman Advanced Authenticaton collection, and set up the environment variables for your PAR Punchh test environment. Once the environment is configured, run the Advanced Authenticaton folder in the Postman collection. Running the requests in this folder tests most of the Advanced Authentication APIs and implements user creation and login scenarios for email OTP and phone OTP, and then proves it by using tokens acquired from these processes to call Mobile and Online Ordering APIs using these tokens.
4. After running these scenarios, study the API endpoint documentation in Appendix A and the scenarios codified in these documents. In particular, take note of the HTTP method, URLs, HTTP request headers, HTTP body, and HTTP responses. Study the data that goes into each call in the Postman collection, sometimes prepared in the pre-request script, and sometimes directly from an environment variable using the pm.environment.get() call, and the data saved after each call in the post-response script.
5. After this, carefully read the message sequence diagrams to learn what to build and how to build it. The data sequence diagram shows the messages and information flows between an end user and the PAR Punchh back end.
6. Relearn the key use cases and key concepts described in this document. Study the relationships between the various data entities in the key concepts. They will enable better understanding of the use cases in the message sequence diagrams. Study the use cases and the data model several times, as the data model helps you understand the use cases, and use cases help you understand the data model.
7. Based on the message sequence diagrams, the Postman collection, and your requirements, build your project plan on how to effectively and efficiently build your integration with Advanced Authenticaton.
Key Business Use Cases
The following sections outline a few key use cases that highlight the feature capabilities of Advanced Authentication. For the comprehensive list of use cases, please refer to the Advanced Authenticaton message sequence diagrams and Postman collection. There are more business use cases defined in the Postman collection, but understanding the following use cases should help you understand the rest of them.
Use Case 1 - Sign in a User Using Email OTP
This scenario explains how a user signs into Punchh using an email address for Advanced Authentication.
1. The Send OTP API is called with the OAuth client ID, validation method, email address, terms_and_conditions=true, privacy_policy=true, and a PKCE code challenge. The Punchh back end looks up the email address and then sends a one-time password (OTP) to the user’s email address.
2. The user acquires the OTP from the email and inputs it into the application, which it then uses along with the email address, OAuth client ID, terms_and_conditions=true, privacy_policy=true, and the PKCE code verifier as arguments to call the Verify Token API. If the request is successful, the HTTP response (in response_body.data) contains the access_token and refresh_token for the login. These fields are saved as temporary data with the user object in the application.
3. The application can make API calls (e.g., Mobile: Fetch User Balance) using the access_token as an argument to authorize that API call on behalf of the user.
Use Case 2 - Sign up a User Using Email OTP
This scenario is executed exactly the same way as Sign in a User Using Email OTP. If the user does not exist, one will be created automatically.
Use Case 3 - Sign in a User Using Phone OTP
This scenario explains how a user signs into Punchh using a valid phone number for Advanced Authentication.
1. The Send OTP API is called with the OAuth client ID, validation method, phone number, phone extension (i.e., country code) terms_and_conditions=true, privacy_policy=true, and a PKCE code challenge. The Punchh back end looks up the phone number and then sends a one-time password (OTP) to the user’s phone number using SMS.
2. The user acquires the OTP from the phone SMS and inputs it into the application, which it then uses along with the phone number, phone extension, OAuth client ID, terms_and_conditions=true, privacy_policy=true, and the PKCE code verifier as arguments to call the Verify Token API. If the request is successful, the HTTP response (in response_body.data) contains the access_token and refresh_token for the login. These fields are saved as temporary data with the user object in the application.
3. The application can make API calls (e.g., Mobile: Fetch User Balance) using the access_token as an argument to authorize that API call on behalf of the user.
Use Case 4 - Sign up a User Using Phone OTP
This scenario is executed exactly the same way as Sign in a User Using Phone OTP. If the user does not exist, one will be created automatically.
Use Case 5 - Refresh Token
Authentication tokens (access_token, refresh_token) expire after a while. If tokens expire, the user does not have to log in as long as the refresh token has not expired. This scenario explains how to use the refresh token to gain fresh tokens.
1. The Refresh Token API is called with the OAuth client ID and the refresh_token as arguments. The successful response to this API call contains fresh tokens in response_body.data. These new tokens should replace the old tokens access_token and refresh_token within the user’s data in the application.
2. The new tokens can be used for API calls as before.
Key Concepts
Implementing PAR Advanced Authentication into an external integration depends on understanding a few key concepts. If you understand these key concepts, and how they relate to each other as described below, it will be easier to understand the key use cases that will enable you to build an integration with PAR Advanced Authentication. This description is organized around key managed data entities.
Provisioned Managed Entities and Data Model
This list describes the 2 types of managed entities:
1. Loyalty User - A loyalty user is a person who signs into Punchh using an email address or a phone number. The email address and phone number must be unique to the business.
2. Punchh Business - A Punchh business is a single business in the Punchh platform. A loyalty user (by email or phone) associated with one Punchh business may also belong to other Punchh businesses.
The application that uses Advanced Authentication APIs would benefit from including data entity models for the loyalty user and the Punchh business.
Message Sequence Diagrams
This section shows the information flows between the External Application, the PAR Identity Service, and the PAR Punchh application.
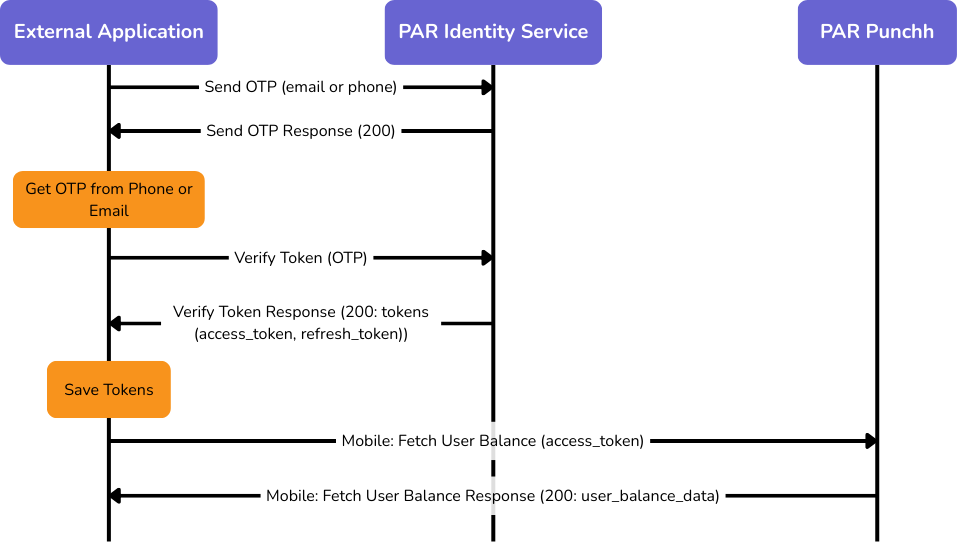
Advanced Authentication - Login
The following diagram shows the information flows for logging in a new user. The flow for creating a new user is identical to the one for logging in. For a new or existing user, both the Send OTP and Verify Token messages must have the terms_and_conditions and privacy_policy attributes set to true. When that happens, the PAR Identity Service will look up the phone number or email address, and if it does not exist, it will create a new user with that email address and/or phone number, and return a 200 response, and then cause an OTP to be sent to the user.
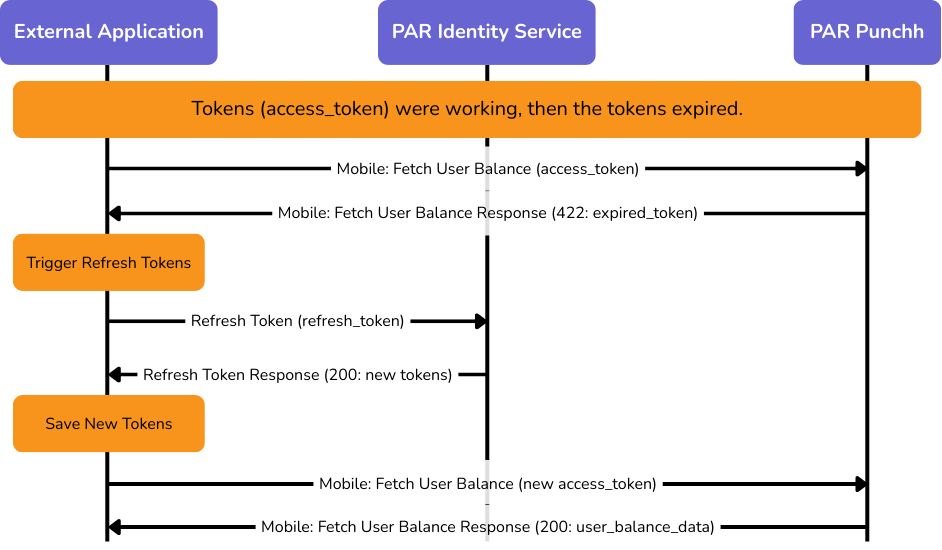
Advanced Authentication - Refresh Token
The following diagram shows how expired tokens (access_token and refresh_token) are refreshed using the refresh_token.
Prerequisites
In order to develop an integration with Advanced Authentication, you will need the following environments set up:
1. Punchh business on a production stack (e.g., Mothership 2). This would include a URL to the Punchh dashboard of that business.
2. URLs used to call Platform APIs.
3. Ask your Punchh representative to enable and configure the above-store configuration for Advanced Authentication, including the domain, client ID, client secret, audience, and public certificate.
4. The OAuth application used for Advanced Authentication on the dashboard must be configured within the Advanced Authentication scope.
Resources
Postman Collection
The PAR Punchh Advanced Authentication Postman collection comprises scenarios that show how to use Advanced Authentication to log a user into Punchh using email or phone, combined with one-time tokens (OTP).
Sample Application
The PAR Punchh Advanced Authentication sample application shows how to use the Advanced Authentication APIs to log into Punchh, and how to use the access token and refresh token to execute Punchh API operations that require user login.