Implement Apple Wallet Pass Integration With POS
This page provides the information required to integrate Apple Wallet Passes with your POS system.
To use a loyalty or offer pass issued by Punchh, some integration adjustments will be necessary, depending on the specific flow and offerings a business chooses to adopt. Currently, Punchh recommends two distinct flows or implementation types:
1. One-Tap Flow (requires changes and support on POS and payment terminal) - Small to moderate effort for POS vendors, currently only supported by loyalty passes
2. Alternative to One-Tap Flow - Requires zero to minimal change effort for POS vendors, currently supported by both loyalty and offer passes
One-Tap Flow - Requires Changes and Support on POS and Payment Terminal
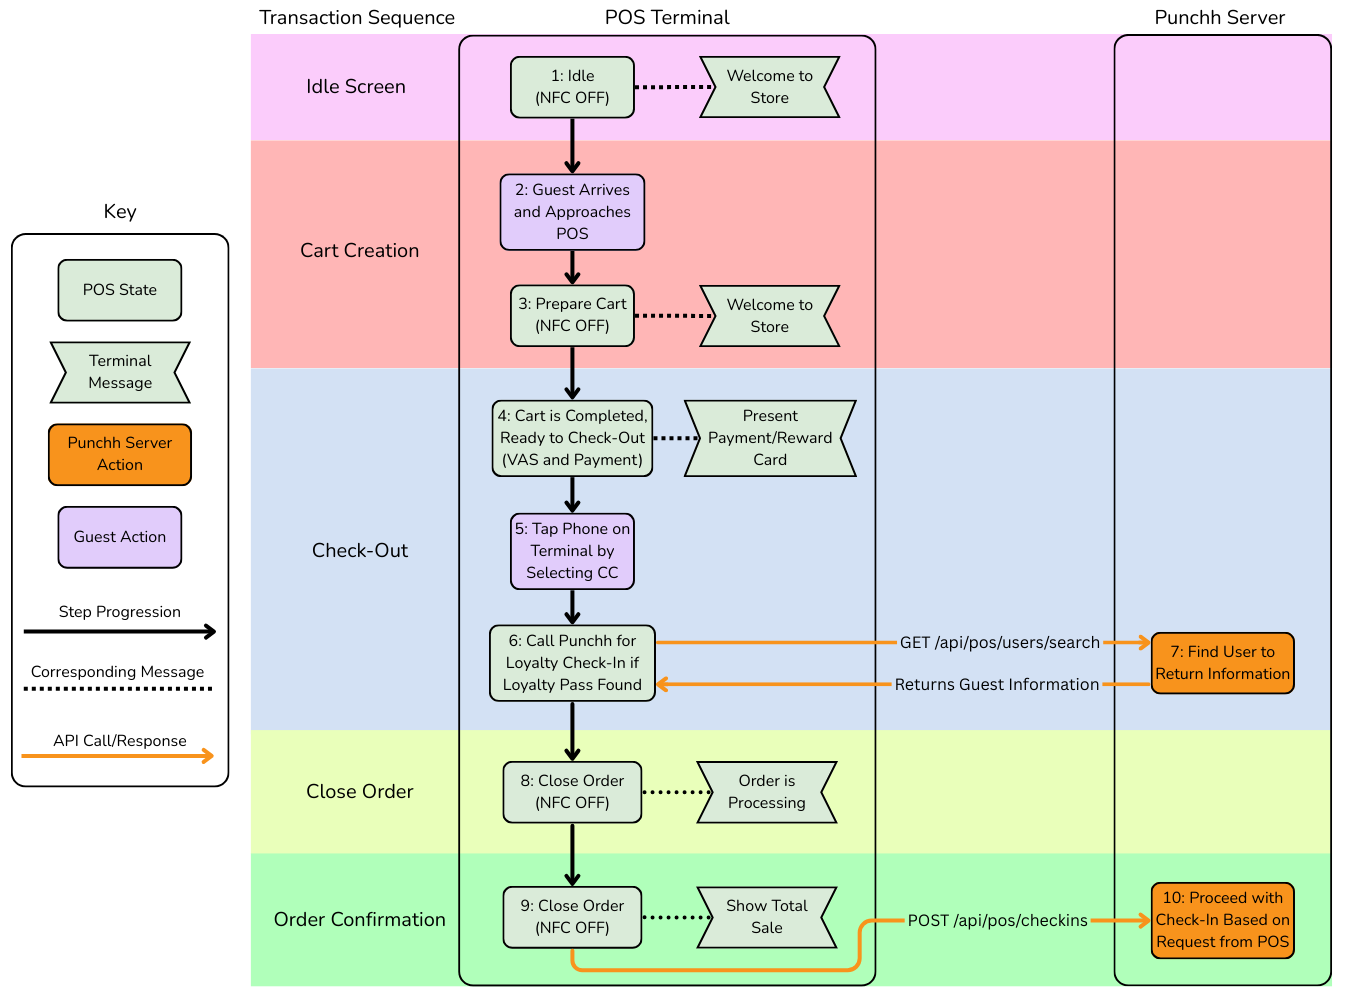
A recommended workflow by Punchh, designed for POS systems and Apple-certified payment terminals, enables businesses to adopt the One-Tap loyalty process for customers with NFC-enabled loyalty passes. In this streamlined approach, loyalty members simply tap their mobile devices on the payment terminal. This action allows the terminal to simultaneously capture the user's loyalty pass details and payment information.
The POS system collects Apple NFC data (apple_nfc_data) sent by the payment terminal and uses this information to query the Punchh User Look-up API to identify the user. Subsequently, the User Look-up API provides the loyalty user's email address or phone number. The values returned in the API response are then used by the POS system to interact with the Punchh server for various operations such as check-ins, redemptions, and more. Meanwhile, the payment information gathered by the payment terminal is processed to complete the transaction.
Once the payment has been processed, check-in should be performed using the email address or phone number fetched from the previous Punchh User Look-up API call.
This implementation supports flows like:
- Redemptions, using Redemption 1.0 APIs and Redemption 2.0 APIs, and Check-in (transaction with offer redemption)
- Multiple redemptions using Redemption 1.0 APIs and Redemption 2.0 APIs (provided if the POS supports the same with Punchh)
- Check-in without redemption
- Guest enrollment (initiate only if a user who does not have a pass opted to pay via Apple Pay). Refer to the User Enrollment section below for details.
Prerequisites for the Integration
- Apple VAS-certified payment terminal with NFC capabilities (terminal with the ability to read the pass from the user’s device on the tap and send the required detail to the POS device)
- Integration between the terminal and POS system to get NFC data, etc., per Apple VAS specification
- Permission to generate the NFC-enabled certificate in the Apple Developer Portal for the business. Go to this page to request an NFC certificate from Apple.
- Punchh business configured with Apple Pass Design and integration configuration. See Smart Passes: Overview and Apple Passes on the Punchh Support Portal.
Note: To view the Punchh product documentation on the Punchh Support Portal, you must log in to a Punchh platform production environment. If you already have access to a production environment, follow the instructions here to access the Punchh Support Portal. - In addition to the above, certain configurations are needed on the terminal as well. Refer to the Configuration Required on the Terminal section below for details.
If all prerequisites are fulfilled and the POS system has received the user's pass NFC data via the payment terminal, then the POS will require minimal to moderate effort to retrieve the user's details from Punchh.
The POS needs to implement the Punchh User Look-up API to look up the user using Apple NFC data. The curl request looks like this:
curl --request GET \
  --url 'https://server_name_goes_here.punchh.com/api/pos/users/search?apple_nfc_data=NFC_DATA_RECEIVED_FROM_TERMINAL' \
  --header 'Accept: application/json' \
  --header 'Accept-Language: ' \
  --header 'Authorization: Token token=LOCATION_KEY_GOES_HERE, btoken=BUSINESS_KEY_GOES_HERE'
Where:
- apple_nfc_data is the NFC data of the pass received by the POS system from the payment terminal when the user taps the device containing the pass onto the terminal that can read the NFC-enabled pass
- token is the location key of the store where the transaction is happening. Punchh will use this information.
- btoken is the business key (UUID) configured for a business in Punchh
In response to the above API call, the POS system receives the user object from Punchh, which contains the user’s email address / phone number. Punchh recommends using either the email address or the phone number (if the business configuration permits) in the subsequent API calls for redemption, check-in, applicable offers, etc.
Basic Check-Out Flow With Apple Loyalty Pass on the POS (NFC)
By satisfying all of the above-mentioned requirements, the POS vendor can create a cohesive and integrated solution that combines loyalty features with Apple Pass and ensures a seamless experience for users to make transactions with Apple VAS services (Pass and Pay) at their POS terminals.
Note: This integration is intended only to support Apple Loyalty Passes.
Alternative to One-Tap Flow - Using Apple Pass Without Any Terminal or POS Integration Change
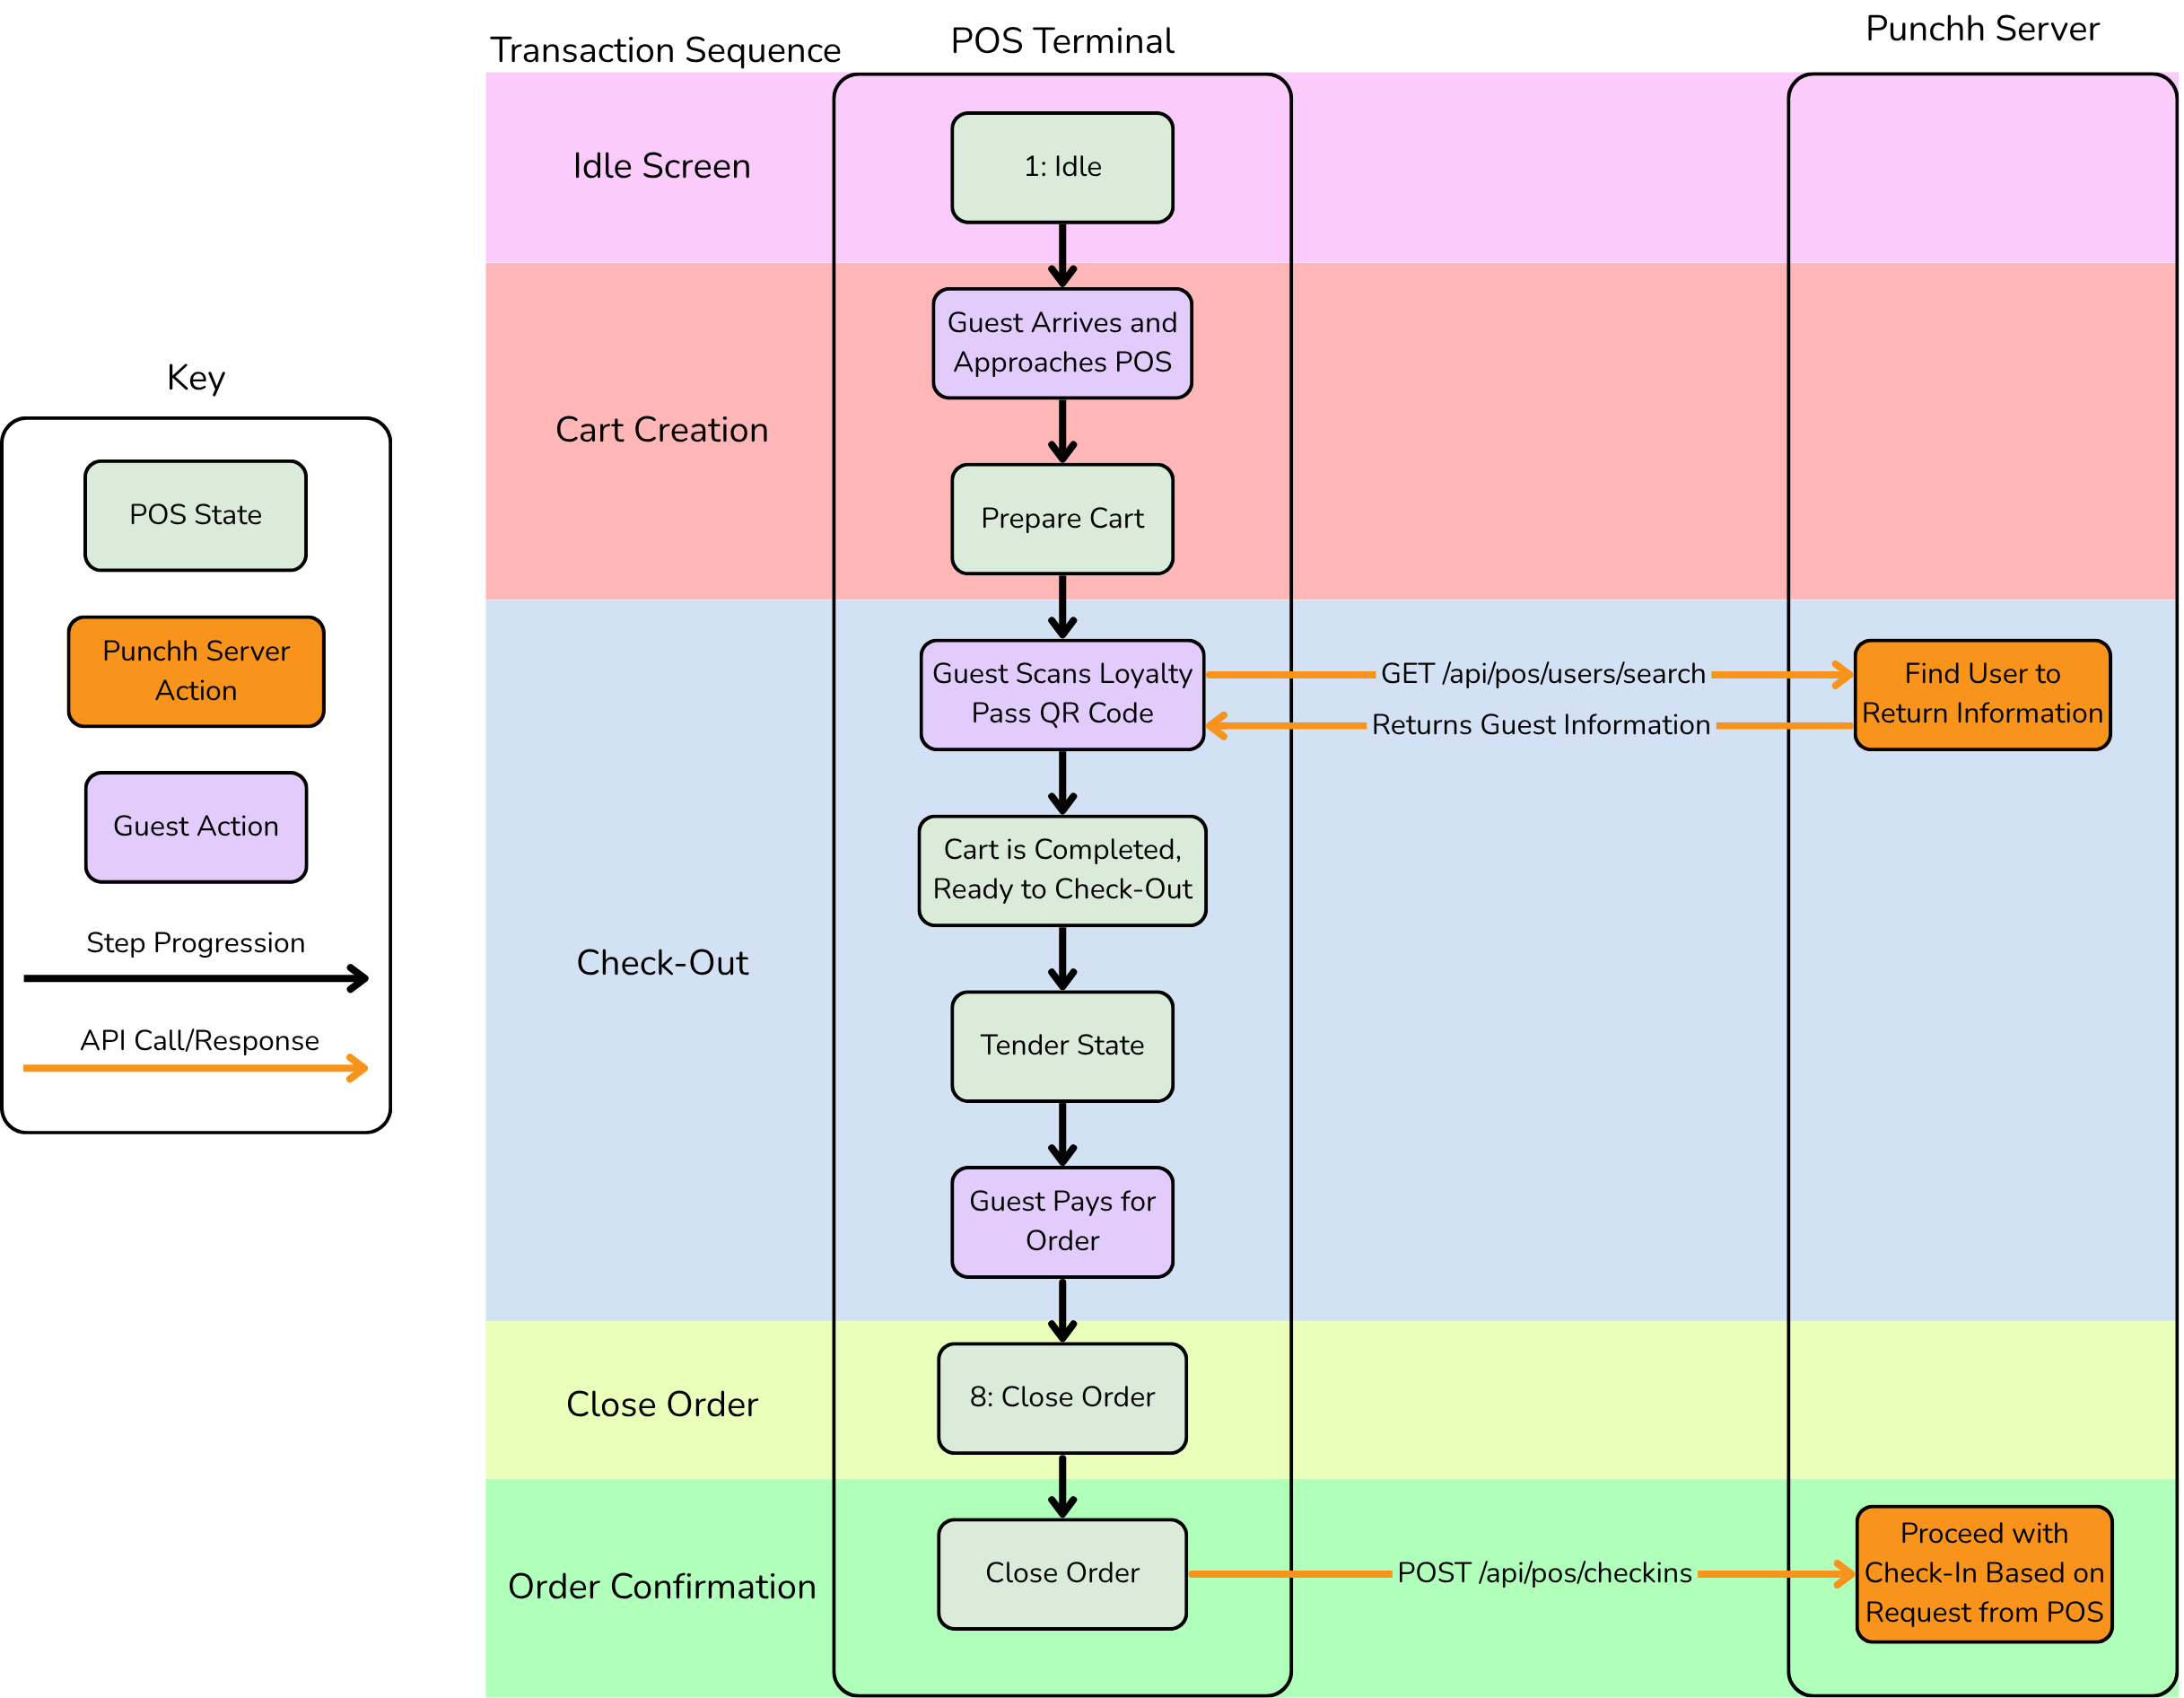
Apple Loyalty Passes, part of Apple Wallet, contain various details like loyalty points, the user’s name, email address, etc. If the store's terminal is not Apple-certified, incorporating QR codes into these passes enables easy scanning and validation, ensuring smoother and faster transactions or entry processes. This also allows for the use of Apple Offer Passes at the POS (Refer to the Apple Offer Pass Redemption section below).
The only requirement is that the POS system should have a Punchh integration and a scanner to scan the user’s QR code or barcode for user/redeemable look-up. The businesses need to manage only the pass distribution, which can be done through email, SMS, etc.
Basic Check-Out Flow With Apple Loyalty Pass on the POS (Non-NFC)
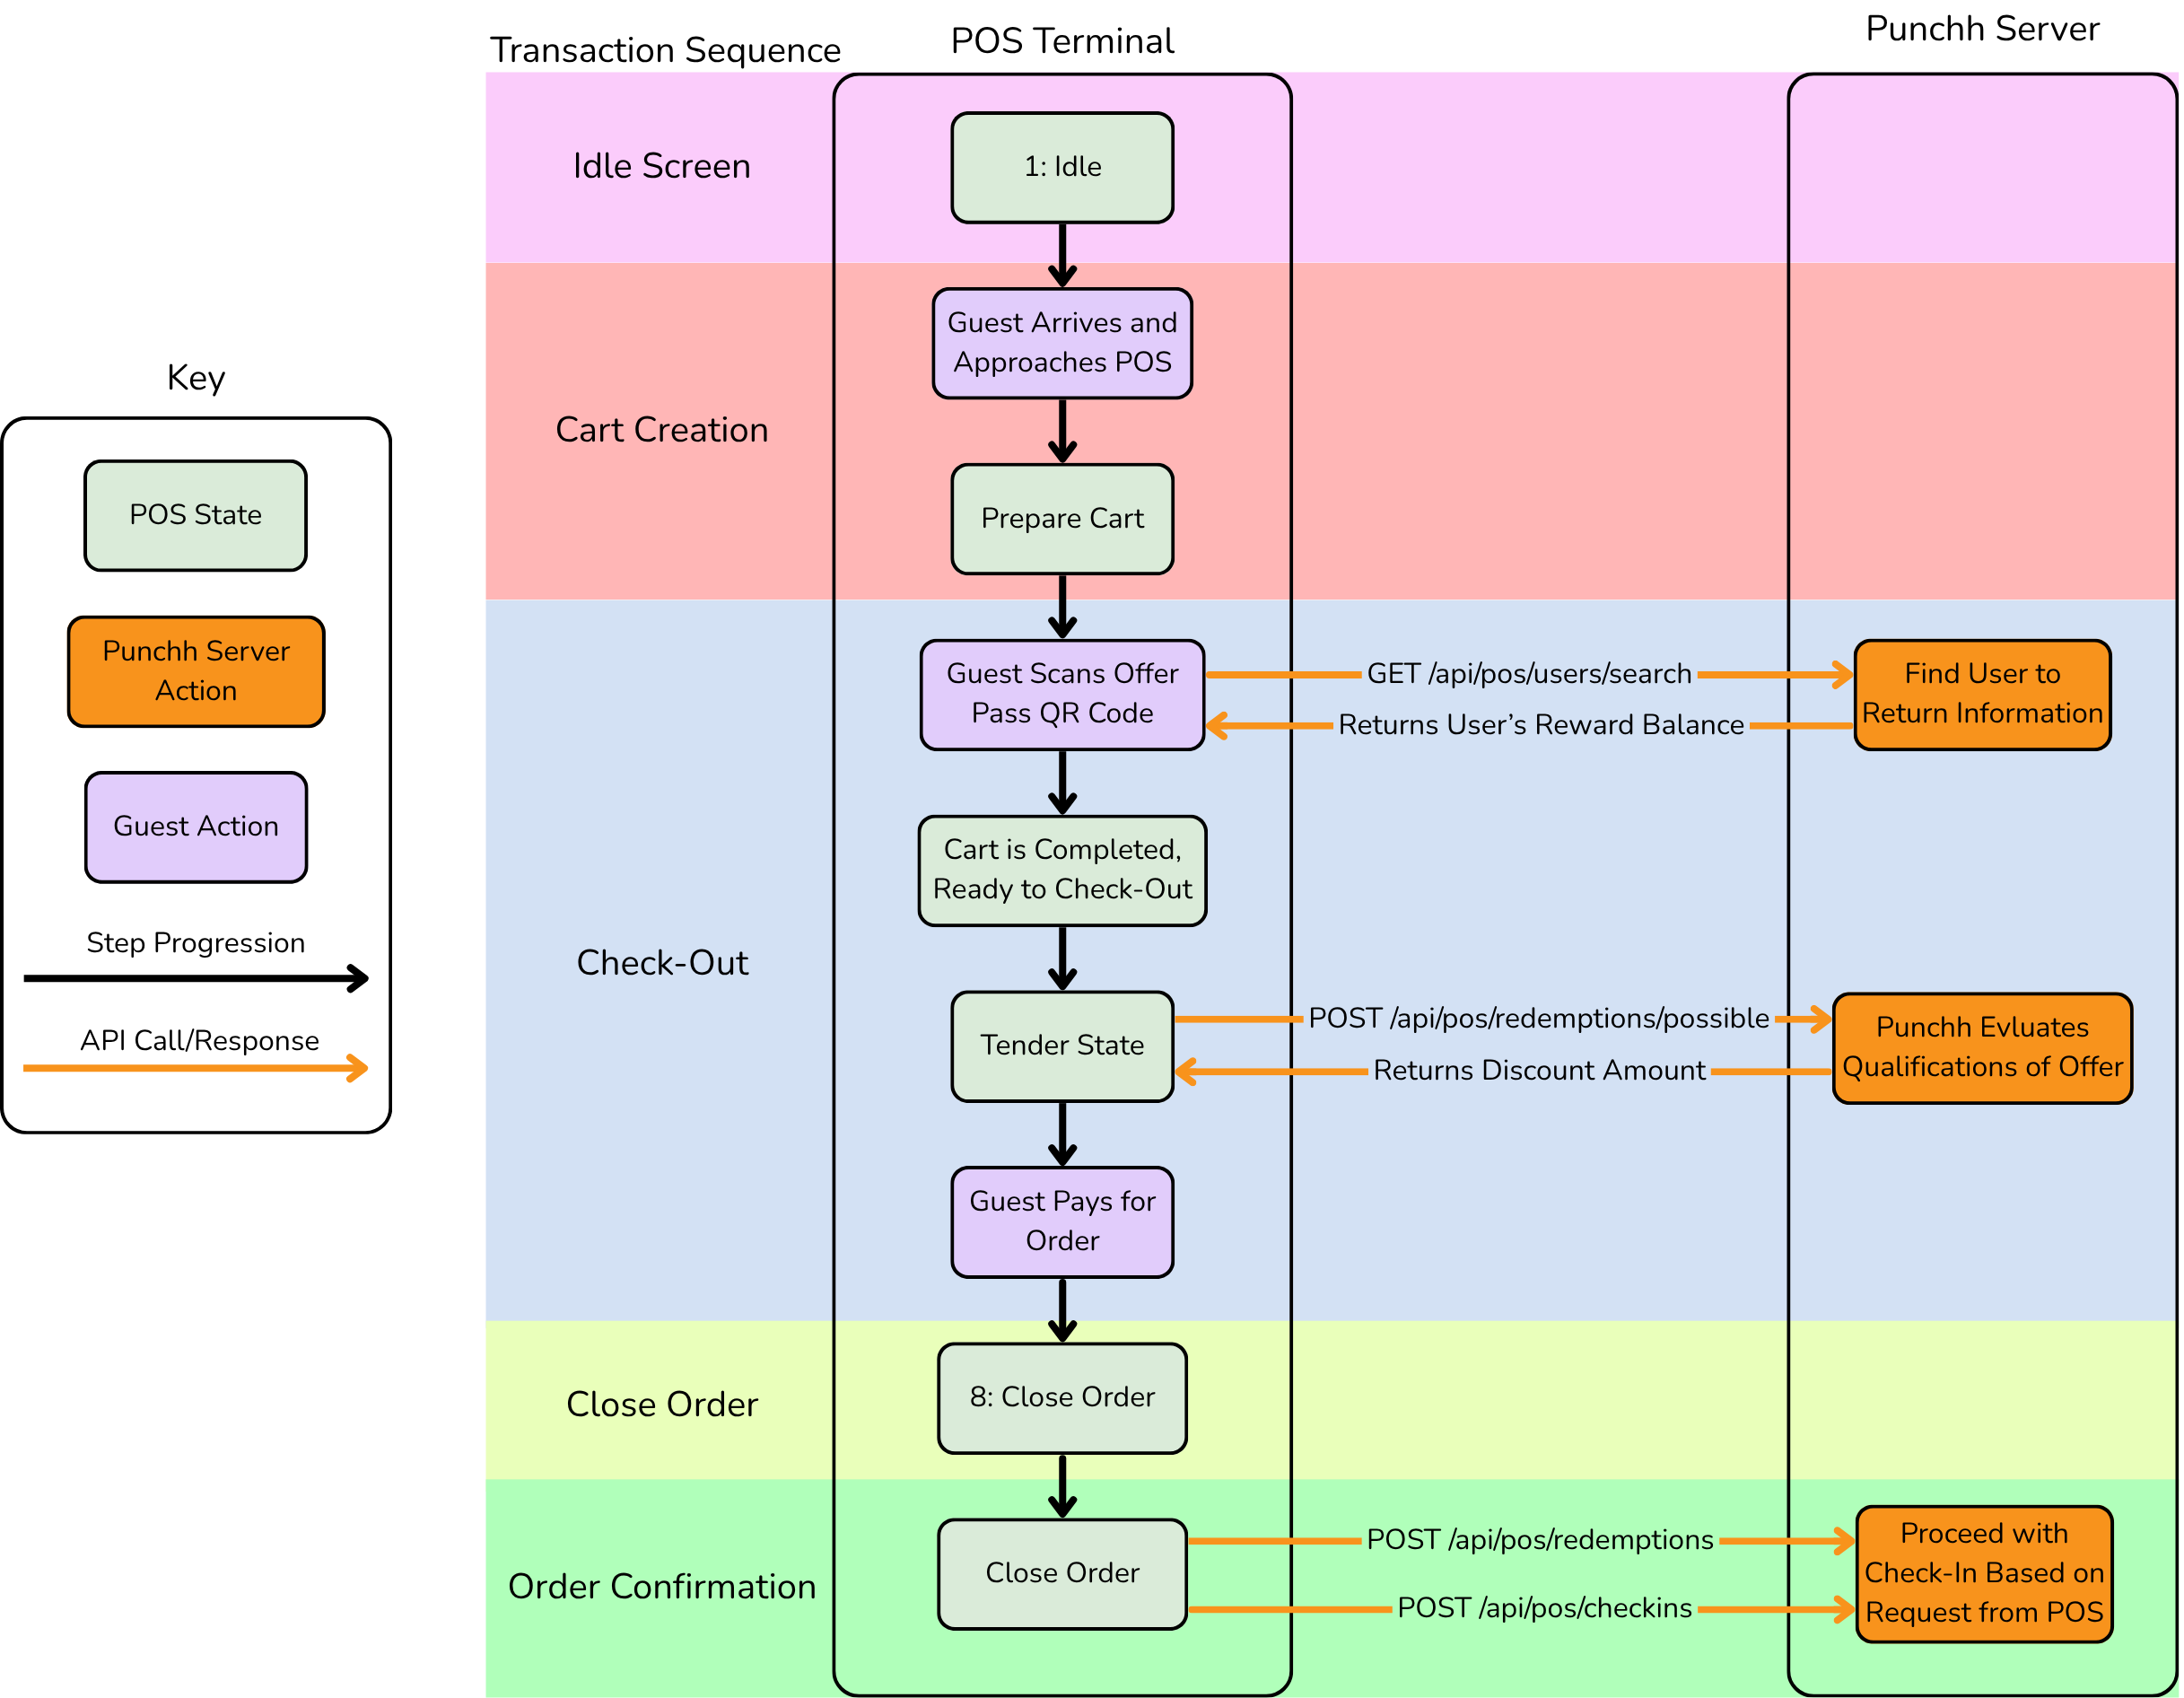
Apple Offer Pass Redemption
Apple Offer Passes, part of Apple Wallet, allow both loyalty and non-loyalty guests to easily redeem coupons and promo codes. In addition, loyalty guests can redeem their redeemables with offer passes. For coupons and promo codes, the offer pass QR code/barcode will share the coupon/promo code's redemption_code. For redeemables, the offer pass QR code/barcode will share the reward_id.
Basic Redemption Flow With Apple Offer Pass on the POS (Redeemable)
User Enrollment
User enrollment through Apple Pass in Punchh refers to a process where individuals can sign up or register for a loyalty program directly from an Apple Wallet Pass on their iPhone or Apple Watch. This method leverages the convenience and accessibility of Apple Wallet to streamline the enrollment process, making it easier for users to join without needing to fill out forms manually on a website or in an app. Here is an overview of how it works and its benefits:
User Enrollment Initiated Through Apple Pass
- Distribution of Apple Wallet Pass - The business will distribute a link to download a personalizable pass through mass notification using a personalizable pass tag (
{{{personalize_pass_url_email}}}) in the message. This pass can be distributed via email, SMS, or terminal at the time of payment. - Interactive Elements - A personalizable pass includes interactive elements that, when tapped, initiate the enrollment process. This could be a "Sign Up" or "Join Now" button directly on the pass.
- Data Collection - Tapping the interactive element can lead the user to a pre-filled form within the pass or open a web page or app where additional information can be collected if necessary. The aim is to minimize the amount of data the user needs to enter manually, leveraging information already stored on the user's device when possible.
- Confirmation and Activation - Once the user submits the required information, the user receives confirmation of the enrollment directly on the user's device. The Apple Wallet Pass can then be updated to reflect the user's new membership status, loyalty points, or access rights.
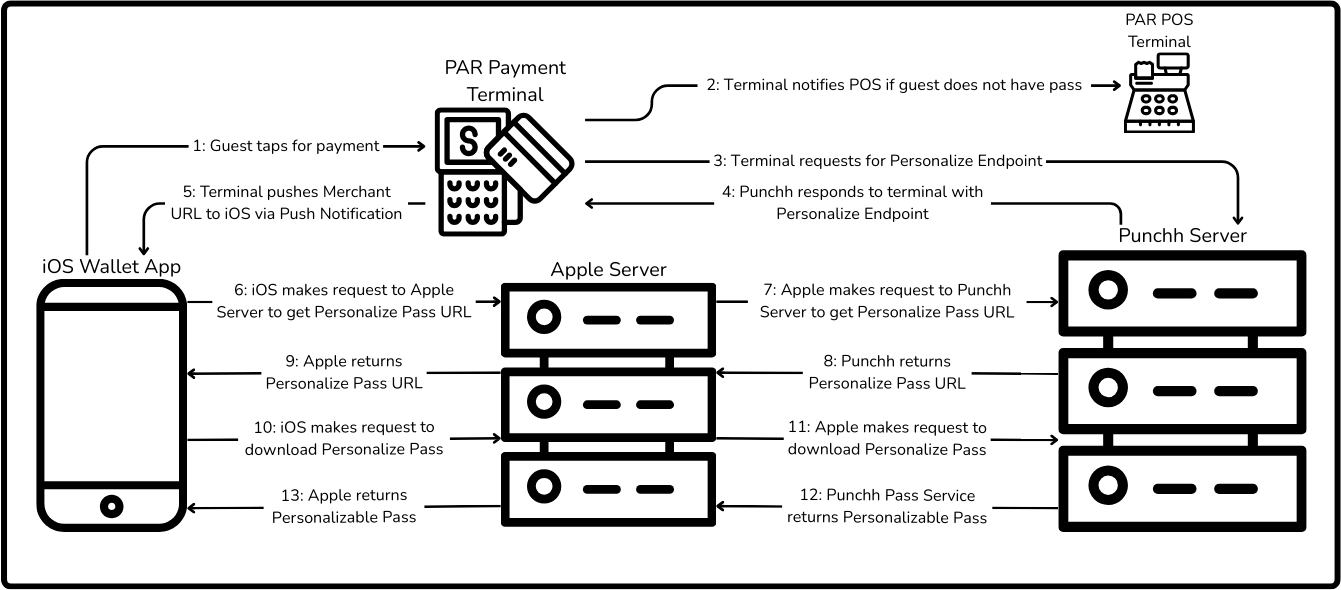
Enrollment Flow Initiated Via Payment Terminal
If NFC is enabled for Apple Pass and a user (who does not have a business-specific pass in the user's wallet app) is interacting with the payment terminal, the device will be pushed with a personalizable pass (via NFC) and a personal notification (PN) will also be sent as part of the enrollment process.
When the user taps the PN, it takes the user to a wallet application and opens a sign-up form. When the user completes the form and submits it, Apple calls the Punchh web service with the entered details.
Depending on the email provided, Punchh either creates the user or fetches the user details (if a user with the email address already exists in the Punchh system) to return the Apple Pass to the user’s device. This pass will update the current personalizable pass (blank pass created by the payment terminal if the user does not have a business pass) with the personalized pass containing the user-provided details.
Flow Diagram for In-Store (PAR POS and PAR Pay Only)
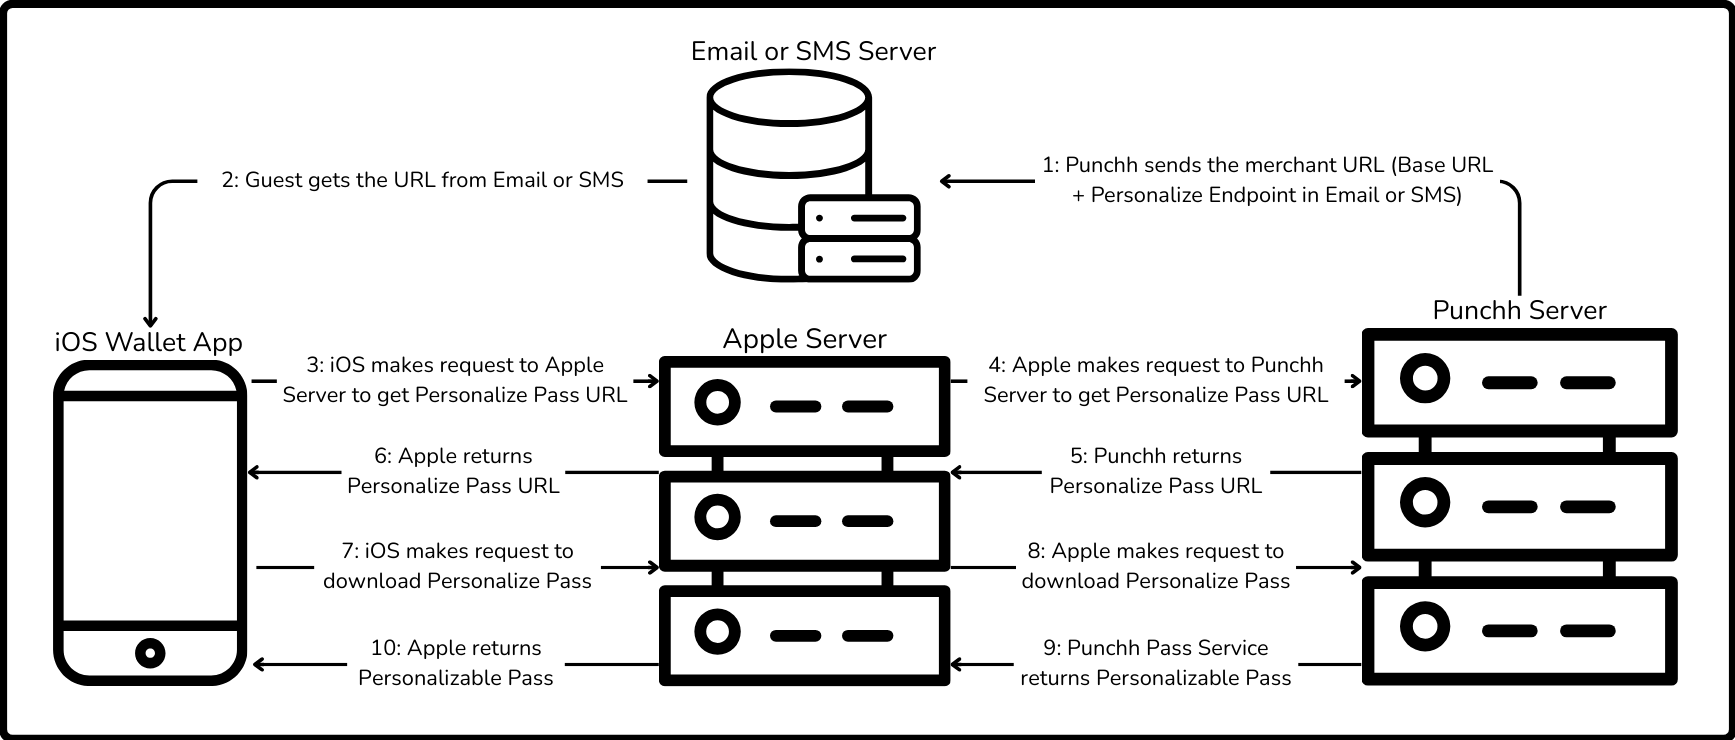
Flow Diagram for Non-NFC Pass Distributed Through Email or SMS
Non-NFC loyalty and offer passes can be distributed through email or SMS via Punchh campaigns. This allows the passes to be distributed at any point in time, not just when a user is at a payment terminal. For instructions on distributing offer passes through campaigns, refer to the How to Distribute Offer Passes Using Campaigns article in the Punchh Support Portal.
Note: To view the Punchh product documentation on the Punchh Support Portal, you must log in to a Punchh platform production environment. If you already have access to a production environment, follow the instructions here to access the Punchh Support Portal.
Configuration Required on the Terminal
Many configurations are required on the terminal, but the ones related to the Apple Pass are:
- Merchant identifier - A string generated on the Apple Developer Portal (see Apple Passes on the Punchh Support Portal). This needs to be the same on Punchh (pass issuer) as well as on the terminal (pass reader).
Note: To view the Punchh product documentation on the Punchh Support Portal, you must log in to a Punchh platform production environment. If you already have access to a production environment, follow the instructions here to access the Punchh Support Portal. - Merchant URL -
{{Punchh Hook URL as per the instance}}/v1/pospass/{{business_slug}}/ - Public key - This should be provided by the payment terminal. It needs to be added to the Punchh configuration.
Punchh Certified POS and Terminal Combination
We already have a working POS integration with Apple Pass One-Tap Flow. These combinations are currently live and can be implemented if any other business wants to go with them.
Currently, Punchh supports these combinations:
- Auphan POS with Verifone Terminal
- PAR POS with Ingenico Lane 7k/3k
- PAR POS with Verifone P400